Today you don’t need to have all of the tools that Hollywood has to make your low-budget film look cinematic. You can shoot an entire movie without using additional lighting setups, as Oscar-nominated Hollywood films such as “Dallas Buyers Club,” “The Revenant,” and “The Tree of Life” were shot entirely with natural light.
Advances in digital filmmaking in the past few years have brought broadcast quality filmmaking tools to the masses and have allowed allotting of low-budget cinematographers the chance to create professional looking films.
Here are some things to consider when prepping to shoot your low-budget film:
Choosing the Right Camera

Not all cameras are created equal. Before shooting it is important that your cinematographer wants the ‘right’ camera for the movie you are going to be making. Different cameras have different characteristics such as higher dynamic range or better low light sensitivity.
If your film has a lot of exterior scenes shot during the day, you are going to want to make sure that your camera has a high dynamic range like the Black Magic, or RED so that your highlights are not blown out, and your shadows are not too dark. Conversely, if your film has a lot of scenes that will be shot at night or in low lighting conditions, you will want a camera that is more sensitive to light such as the Canon C300, or even the 5D Mark III.
By doing camera tests to find out what cameras work best in the lighting conditions, you plan on using, you will save a lot of time and energy in setting up the shots.
Working with the Sun
The photographic image exists because of light, without light to expose the film negative there would be no picture. The same principles are true when shooting on digital cinema. When working without additional lighting setups, it is important for cinematographers to know where the sun is, and where it is going to go to frame shots and movements properly.
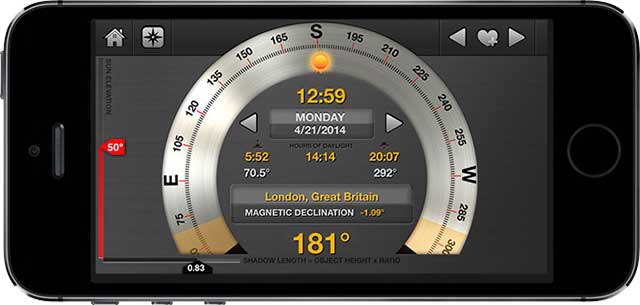
Having the Right Equipment: Chemical Wedding created an app called ‘Helios” that can help cinematographers track the flow of the sun, for pre-visualization of shots and light studies it is an invaluable tool to have in your pocket. It can also be used with “Artemis Directors Viewfinder” to visually see the shot with the lens you wish to use before setting up the shot.
Framing the right shots: When shooting daytime exteriors, framing your shots using the sun as a backlight is critical. By re-positioning your actors, you create a beautiful halo of light around your actors’ heads separating them from the background. Framing this way also allows you to avoid harsh shadows and blow out highlights created by the direct sun on their faces.
Discover “Blue Hour”: Most people know about the importance of shooting at “Magic Hour” or the hour directly after sunrise and directly before sunset when the quality of the sunlight is at its most beautiful creating a soft, forgiving quality of light that makes everything look magical, but not everyone knows about “Blue Hour.” Blue hour is the time directly after the sun has set, or right before it rises when there is just enough ambient light in the sky for you to shoot a ‘night exterior’ scene without requiring using new lights.
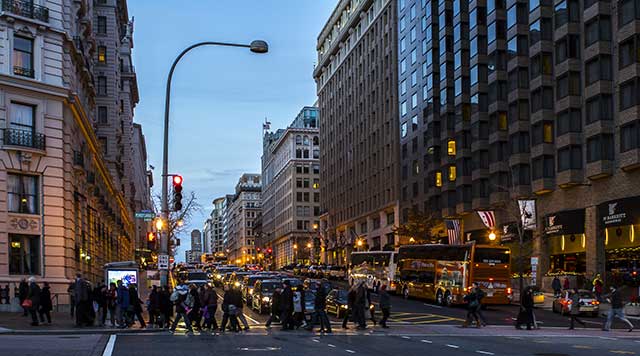
During blue hour you will have all of the external light sources such as street lamps, car head lights and window lights that create the appearance of nighttime, with just enough ambient daylight to shoot at a reasonable ISO without having to light for night. Knowing when Magic Hour and Blue Hour is instrumental to being able to achieve the shots you want without artificial light in exterior scenes.
Blocking and Directing the Sun
There is a limited scope with the sun without directing and reflecting its light. That is why it is important for every Gaffer to have in their kit an extensive set of flags and reflectors for the cinematographer to control. Mirrors take the light in a given scene and allow you to redirect or reflect that light in the direction you want to create ‘fill’ light or ‘bounce’ on an actors face. Inversely, Flags allow you to ‘cut’ light that is too much or control the direction and intensity of light sources to balance out your image. For more in-depth information about how to use flags and reflectors, you can check out the links I’ve provided below.
Using Natural Light Effectively: When shooting indoors, pay particular attention to not shoot directly into a window as this can lead to nasty shadows with blown-out highlights. Instead, place the camera adjacent to the window and let the light from the window provide an excellent fill light for your subject. If you have to shoot facing a window, make sure that you have enough neutral density gel filters to block out the extra light coming in as it may be several stops higher than the interior of the location.
Making use of Practical
With the native ISO of most DSLR’s and Digital Cinema cameras being upwards of 800 ISO, efficient lighting for interiors, most often can be sufficient for completely lighting and covering the scene. Don’t underestimate the power of possibly using natural lighting to create the looks and feelings for your interior scenes. Having an influential art director who knows how to practically light up and create the mood within a scene is a key. Active communication between the director-cinematographer and art director is crucial for lighting when only using practices. Often by just changing the wattage of the efficient light bulbs in a scene you can increase the light levels enough that you can shoot without having to add additional lights.
Final Thoughts
Shooting without artificial lighting is a challenge, but a challenge that is manageable and can produce stunningly beautiful cinematographic images if done right. The most important tool a Director of Photography has is their ability to pre-visualize what the shot and lighting will look like ahead of time and communicate that with his or her team. Don’t underestimate the importance of planning and reversing the shots before you need to shoot them, as frequently when shooting with natural light your window of opportunity to get the shot is very narrow. It is also important to make sure that your locations are ‘the right’ spots before you shoot in them. Having a place which doesn’t have enough light, or does not look beautiful at the time of day you are shooting can create real problems. By properly scouting the location in advance with both your Cinematographer, Gaffer, and Art Director and by doing a proper light study of the area can ensure that you avoid this problem.
Video Caddy